 Do you own more than 2 or 3 bowling balls? Then it’s high time you start organizing them and put them on display safely. And, to do that, you need the best bowling ball racks to hold your balls in places with proper security. Some of you may think racks are racks, what’s so special about that? Well, you’re wrong. There are many fragile bowling racks you can find in the market that will break over time, and as a result, it will damage your precious bowling balls too. Who wants that? No one! So you better get yourself a strong bowling ball storage rack before it’s too late. Here are some of the options that you might be interested in.
Bowling Ball Rack Reviews
Optimal Branding Solutions Bowling Ball Rack
- No tools required for assembly
- Furniture-Grade Construction (pocket-hole assembly, routed edges, plane and true surfaces)
- Manufactured in the U.S.A
- Extremely robust and professional workmanship
- Ready for immediate use as-is, or customer DIY stain/paint customization as desired
There are many choices designed specifically for the purpose of bowling ball organization and its maintenance. This is why the bowling rack by Optimal Branding Solutions stands out. As assembling requires no tools or instruments, and it only takes a few minutes, you don’t need to hire a professional to do this easy job of putting it together.
This bowling balls rack is available in three different sizes, so based on your number of bowling balls, you can go for any of them. Made with furnishings-grade pinewood and constructed with pocket-hole assembly, plain and true surfaces, and routed edges for maximum ball protection.
As these racks are engineered and manufactured with the best materials carefully, they’re highly robust and dependable. The professional craftsmanship is indeed noteworthy. You can tell by its built that these bowling racks are designed and distributed by the bowlers, for the bowlers.
Pros:
- Highly reliable
- Extraordinarily sturdy
- The wooden body is customizable, you can paint or stain to match your style
- Easy to assemble
- Protects your bowling balls
Cons:
- If all your balls are over 15lbs and the rack is fully stacked, the rack tends to get shaky a little. But don’t worry, it won’t break down.
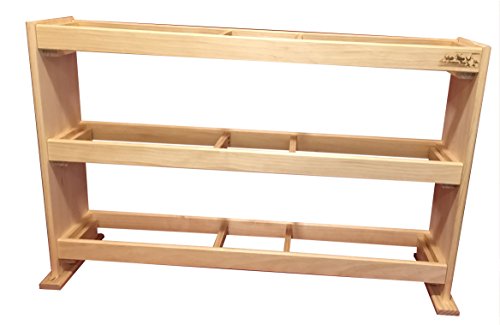
TFKitchens Bowling Ball Rack
Now, this is a masterpiece among other bowling ball racks in the market. Made of plywood, this bowling ball storage rack is very strong. Available in 4 different sizes- 3 balls, 6 balls, 9 balls, and 12 balls. Based on your number of bowling balls, you can go for any of them. Despite your balls’ weight, the rack can easily hold them without breaking.
Each board in the rack has holes cut out to fit the bowling ball properly. The holes are far from each other, which means there will be a certain distance between the bowling balls, and they won’t touch each other.
The whole thing comes unfurnished, without treatment. Although it may seem like a con, you get to customize your bowling ball rack any way you want. How cool is that! To move it easily, there are two cut-out handles. So just grab some sandpapers and paints and make some room for a fun time.
Pros:
- Robust and reliable
- The wooden body is customizable, you can paint or stain to match your style
- Easy to move
- Protects your bowling balls
Cons:
- Some might prefer a treated and finished one, but TFKitchens don’t provide that
How should I store my bowling ball in a Bowling Ball Rack?
Bowling ball’s crack is every bowler’s biggest fear. It’s easier to accept when you use a bowling ball for quite a while and they start to wear off, but if you see your newly purchased bowling balls are about to get damaged because of your lack of knowledge, and insufficient care and protection.
One of the best ways to store your bowling balls properly is by keeping them on a rack. You may not know, but bowling ball racks are truly the best options for storing purposes. But here is the question, just stacking them on the bowling ball rack- is that enough? Of course not! So what can you do to make sure, your bowling balls are safely stored in the bowling rack?
First of all, make sure that each ball has some gap between them. If you stuff your bowling balls tightly without any space between them on the rack, the balls won’t be at ease. If two balls’ coverstock is in touch with each other for too long, the color will get damaged. So do make sure that the balls have at least half an inch of distance between them.
Did you know, your bowling balls can crack without even throwing them hard? Well, to prevent that, you should never keep your bowling balls in the same position for too long. The key to maintaining your bowling balls safely and enhance their lifespan is by rotating them at least a quarter turn or more every week or so. These occasional rotations will help relieve and readjust the pressure of the core on the coverstock layer. Doing this will increase the ball’s longevity and prevent it from developing any visible cracks when you’re not using them for a while. If you don’t rotate your bowling ball that was kept in the rack for too long, and then all of a sudden decide to play with it, your bowling ball will most likely crack hard and it will be impossible to use and of course, non-repairable.
Always, and by always I mean Always keep your bowling ball in a cool and dry place. Many of us want to keep our bowling ball rack in the garage or basement or sheds where there isn’t sufficient humidity. Plus, these places get affected by outside conditions pretty easily. So, to ensure the best storage facility, keep your bowling balls clean, wrap them in a fabric bag or towel and the place where you’ll set the bowling rack. Make sure it is a humidity-controlled environment, and at a normal temperature (not too warm or too cold). Also, never keep your bowling ball rack under direct sunlight, it will discolor the ball easily. So adapt these thoughtful steps, and care for your balls for best results if they need long-term storage.
How Do You Make a Bowling Ball Rack (DIY Method)?
Do you know you can just build your own bowling ball rack at home? If you have steady hands and a few tools, you can easily make your own bowling rack following a DIY method. For a DIY bowling ball rack, here are some of the things you will need:
What You Need
- Two 2” x 6” x 4’ wood boards
- Four 2” x 2” x 2” 4-feet long wood boards
- Two 4” x 2” x 2” 2-feet long wood boards
- One Measurement tape
- Fourteen 1” long nails
- One Hammer
- Some sanding papers
- Pencil or pen
When you’re choosing bowling ball racks, you’ll want to consider a few key factors. First, think about how many bowling balls you need to store. You can choose from single-tier, two-tier and three-tier ball racks. Second, think about the size of the balls. You can customize wood board size according to your need. It is not necessary that you have to follow this bowling ball rack dimension. I have just given a standard size. Now it is up to you how many layer bowling ball rack you need.
How To Build The Bowling Ball Rack [Step By Step]
Step 1: Put the two 2” x 6” x 4’ high wooden boards on their sides. Then make a 4-feet distance- one side of the 2” width of the boards should touch the workspace while the opposite 2” of the board width should face upwards.
Step 2: Place one of the 2” x 2” x 2” 4-feet long boards on top of the two 2” x 6” x 4’ high boards. Nail the first one into the boards on both ends using two nails. Use the hammer carefully.
Step 3: Now take the other 2” x 2” x 2” 4-feet wood board and place it at the bottom of the two 2” x 6” x 4-feet boards. Nail them both using two nails at both ends.
Step 4: Now you have to measure 10-inches up (height) from the top of the bottom 2” x 2” x 2” 4-feet wood board. Mark it using a pen or pencil. Now place another 2” x 2” x 2” 4-feet wood board at the marked point. Nail the board using two nails on both sides.
Step 5: After step 4, measure 10-inches up (height) again from the top of the second or middle 2” x 2” x 2” 4-feet wood boards. Again mark it with a pencil and then place a 2” x 2” x 2” 4-feet wood board at the marked point. Nail it as you did before. By now there will be four 2” x 2” x 2” 4-feet long wood boards nailed into the two 2” x 6” x 4’ wood boards on both sides. This time you will be able to see a rack-like structure.
Step 6: Now grab a 4” x 2” x 2” 2-feet wood board and nail it to the bottom of one 2” x 6” x 4’ board. Make sure it is perpendicular to the 2”x2”x2” 4-feet boards. This allows the whole structure to stand on strongly. Repeat this exact step on the other side of this structure with the remaining 4”x2”x2” 2-feet board.
Step 7: Now all you have to do is- set the bowling ball rack, upright, where the 4” x 2” x 2” 2-feet wood board will act as feet. Next, grab some sandpapers and sand the boards and get rid of the sharp edges, and smooth them out. You’re now done with crafting and your bowling rack is ready to use.
If you want, you can customize your bowling rack any way you want. Color it, stain it, add some stickers to match your style, and create the most fantastic ball rack. When you do that, make sure you’re following the instructions properly.
Conclusion
If you’re buying more than 2 bowling balls a year, congratulations, you’re indeed a true bowler. If you want to use and preserve your bowling ball collection properly and keep them free of damage, you need to apply the best solutions for safety. Hence comes the bowling ball racks. You can either buy the best bowling ball rack or make it yourself- but either way, you should own one if you want your bowling balls to grow old with you. Good luck!
Last update on 2024-07-12 / Affiliate links / Images from Amazon Product Advertising API
